
Peppermint Mocha Tiramisu Recipe
Get ready to elevate your holiday dessert game! This Peppermint Mocha Tiramisu is a festive twist on the beloved Italian classic. Imagine layers of creamy mascarpone, coffee-soaked ladyfingers, and a refreshing hint of peppermint, all dusted with rich cocoa powder. It’s the perfect no-bake dessert to wow your guests and bring a little extra magic to your holiday table.
This recipe combines the rich, bold flavors of a peppermint mocha with the light, airy texture of traditional tiramisu. It’s surprisingly simple to make, yet looks incredibly elegant. Whether you’re a seasoned baker or trying your hand at a new dessert, this guide will walk you through every step to ensure a perfect result. Let’s get started on creating a dessert that’s sure to become a new holiday tradition!
This post may contain affiliate links. As an Amazon Associate, I earn from qualifying purchases.
What You’ll Need: Your Ingredient Checklist
Quality ingredients are the key to a truly exceptional tiramisu. Here’s everything you’ll need to create this festive treat. We’ve included some suggestions for products you can find on Amazon to make your shopping a breeze.
For the Mascarpone Cream:
- Mascarpone Cheese: You’ll need 16 ounces (about 2 cups) of high-quality mascarpone cheese, at room temperature. A good mascarpone is essential for that signature creamy texture. We recommend brands like BelGioioso , which are known for their rich and smooth consistency.
- Heavy Whipping Cream: 1 ½ cups, cold.
- Granulated Sugar: ¾ cup.
- Large Egg Yolks: 4 large egg yolks, preferably from pasture-raised eggs for a richer color and flavor.
- Peppermint Extract: 1 teaspoon of pure peppermint extract. A little goes a long way! Using a quality extract like Nielsen-Massey ensures a clean, crisp flavor without being overpowering.
- Vanilla Extract: 1 teaspoon of pure vanilla extract.
For the Espresso Mixture:
- Strong Brewed Coffee or Espresso: 1 ½ cups, cooled. For the best flavor, use freshly brewed espresso. If you don’t have an espresso machine, a strong drip coffee or French press coffee will also work wonderfully.
- Coffee Liqueur: ¼ cup (optional, but highly recommended). Kahlúa or Tia Maria are classic choices.
- Granulated Sugar: 2 tablespoons.
For Assembly:
- Ladyfinger Cookies (Savoiardi): About 24-30 cookies. These are the traditional choice for tiramisu, as their dry, spongy texture is perfect for soaking up the coffee mixture without falling apart.
- Unsweetened Cocoa Powder: For dusting. A high-quality Dutch-process cocoa powder, like Ghirardelli , will provide a deep, rich chocolate flavor.
- Garnish (Optional): Crushed peppermint candies or chocolate shavings.
Step-by-Step Guide to Perfection
Ready to assemble this masterpiece? Follow these simple steps for a flawless Peppermint Mocha Tiramisu.
Step 1: Prepare the Espresso Mixture
In a shallow bowl or dish, combine the cooled espresso, coffee liqueur (if using), and 2 tablespoons of sugar. Stir until the sugar is completely dissolved. Set this aside while you prepare the cream. This mixture will give the ladyfingers their signature coffee kick.
Step 2: Make the Mascarpone Cream
This creamy filling is the heart of the tiramisu!
- Whip the Egg Yolks: In a large bowl, use an electric mixer to beat the egg yolks and ¾ cup of sugar together on high speed until the mixture is pale yellow, thick, and has roughly tripled in volume. This usually takes about 5-7 minutes.
- Add Mascarpone: Gently fold the room-temperature mascarpone cheese into the egg yolk mixture until just combined. Be careful not to overmix, as this can cause the mascarpone to become grainy.
- Whip the Cream: In a separate, clean bowl, whip the cold heavy cream until it forms stiff peaks.
- Combine: Gently fold the whipped cream into the mascarpone mixture in two or three additions. Finally, fold in the peppermint and vanilla extracts. The result should be a light, fluffy, and decadent cream.
Step 3: Assemble Your Tiramisu
Now for the fun part—layering!
- First Layer of Ladyfingers: Working one at a time, quickly dip each ladyfinger into the espresso mixture for just 1-2 seconds per side. You want them to be moist, not soggy. Arrange the dipped ladyfingers in a single layer at the bottom of an 8×8 inch or 9×9 inch baking dish.
- First Cream Layer: Spread half of the peppermint mascarpone cream evenly over the layer of ladyfingers.
- Second Layer: Repeat the process with another layer of dipped ladyfingers, placing them on top of the cream.
- Final Cream Layer: Spread the remaining mascarpone cream evenly over the top. Use a spatula to create a smooth surface or gentle swirls for a more rustic look.
Step 4: Chill and Set
Cover the dish with plastic wrap and refrigerate for at least 6 hours, but preferably overnight. This chilling time is crucial! It allows the flavors to meld together and the tiramisu to set properly, making it much easier to slice and serve.
Serving and Presentation Tips
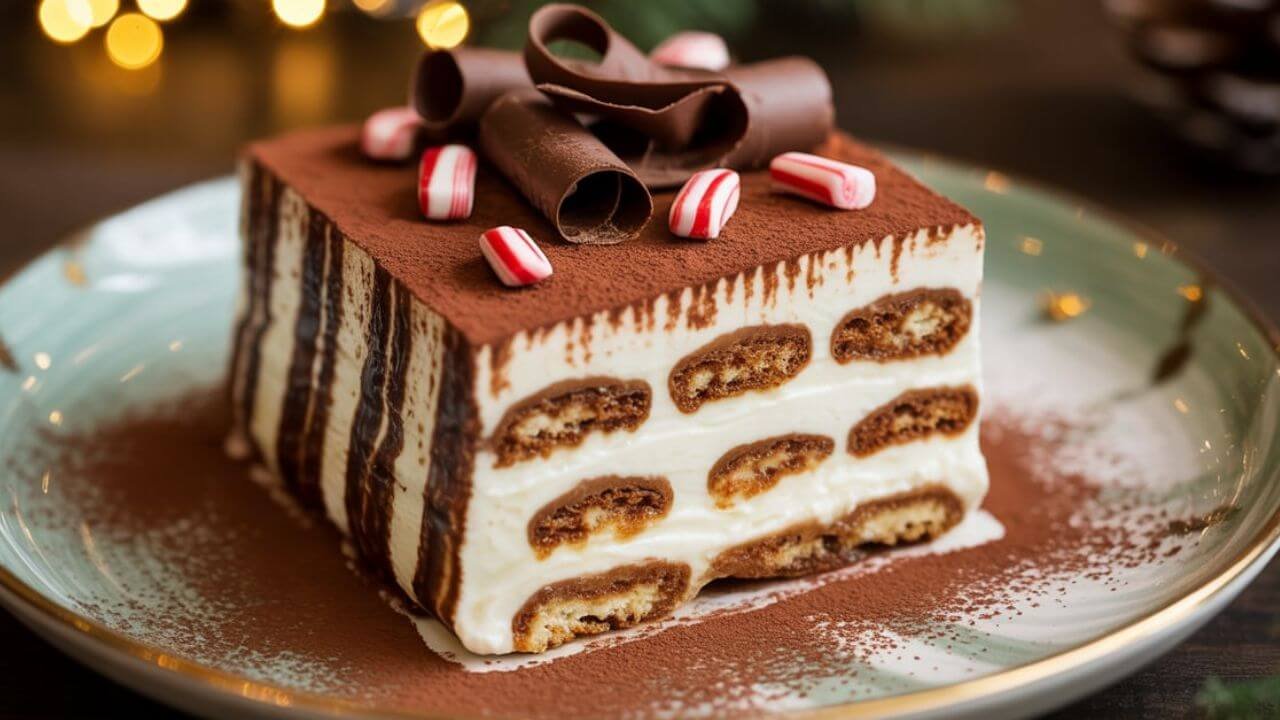
Before serving, dust the top of the tiramisu generously with unsweetened cocoa powder using a fine-mesh sieve. For an extra festive touch, sprinkle some crushed peppermint candies or chocolate shavings over the top.
Serve chilled, cut into squares. The contrast of the creamy layers and the soft, coffee-soaked ladyfingers is pure heaven!
Customization and Variations
Want to put your own spin on it? Here are a few ideas:
- Decaf Version: Use decaffeinated espresso or strong coffee to enjoy this treat any time of day.
- Extra Chocolatey: Add a layer of mini chocolate chips or finely chopped chocolate between the cream layers for an added crunch and chocolate boost.
- Booze-Free: Simply omit the coffee liqueur. The dessert will still be delicious!
Read More: Easy Pecan Pie Cheesecake Bars Recipe
A Sweet Holiday Treat
This Peppermint Mocha Tiramisu is more than just a dessert; it’s an experience. Creating something so special for your loved ones is one of the great joys of the holiday season. Each bite is a delightful combination of festive flavors that will have everyone asking for the recipe.
So go ahead, gather your ingredients, and enjoy the process of making this show-stopping dessert. We promise it will be the star of your holiday celebration!
Hi, I’m Mia! I’m passionate about helping you achieve your weight loss goals through natural, effective methods. On this blog, I share the best smoothie recipes for weight loss, top-rated supplements that actually work, and practical tips on how to lose weight fast and naturally. Every product and recipe is handpicked to support a healthier, more confident you.